This Sourdough Bread beginner's guide will walk you through every step, from creating a starter to baking the perfect loaf, with plenty of tips and tricks along the way!

Do you want to master the perfect sourdough bread recipe at home? Then you're in the right place. It can seem like a mystery at first-feeding a starter, stretching dough, scoring, and waiting for that magical oven spring. But here’s the good news: it’s totally doable, even if you’re a complete beginner.
Here, you will learn how to conquer the art of sourdough bread at home – with plenty of tips and a detailed guide. This sourdough bread recipe is a winner with its soft crumb, crispy and dark-baked crust, and its balanced tang. For me, it's the perfect bread!
If your first loaf of sourdough bread doesn’t turn out perfect, don’t give up yet! You will get better with each loaf you bake!

What is Sourdough?
Sourdough is a simple mixture of water and flour that ferments through the natural activity of lactic acid bacteria and wild yeast-no commercial yeast needed. It's one of the oldest methods of baking bread.
While the long fermentation process takes time, it makes sourdough easier to digest, helps break down some gluten, and keeps the bread fresher longer. With its tangy flavor and chewy crust, sourdough is not only delicious but also a rewarding bread to bake from scratch, especially when you've nurtured your own starter. Here is a guide on how to make sourdough starter from scratch!
Hydration
Sourdough bread is slightly different from yeast bread. If you've already baked yeast bread, you might find sourdough a bit easier to get the hang of. Sourdough bread is typically made with more water than traditional bread, which makes it airy but a bit more challenging to handle. This is known as hydration!
Sourdough bread usually has a hydration level of 60-90%. My recipe has a hydration level of 66%, meaning the amount of water is 66% of the flour's weight. This is ideal for beginners. The higher the hydration, the harder it is to work with the dough.

Flour
For the best results, I highly recommend using bread flour. It has a higher protein and gluten content than regular white flour. This allows it to absorb more water, making the dough more elastic and forming a stronger dough structure, which will make your sourdough bread much better!
email me this recipe 💌
Outside of America, bread flour is often not available. In this case, Manitoba Flour (Type 0) or Pizza Flour (Type 00) are an excellent alternative.
Tools You'll Need


You'll also need:
- Kitchen Scale
- Clear Food Storage Container (approx. 4-Quart) - to observe the dough during bulk fermentation
- Bread Lame – or a very sharp knife
Ingredients
See recipe card for quantities.

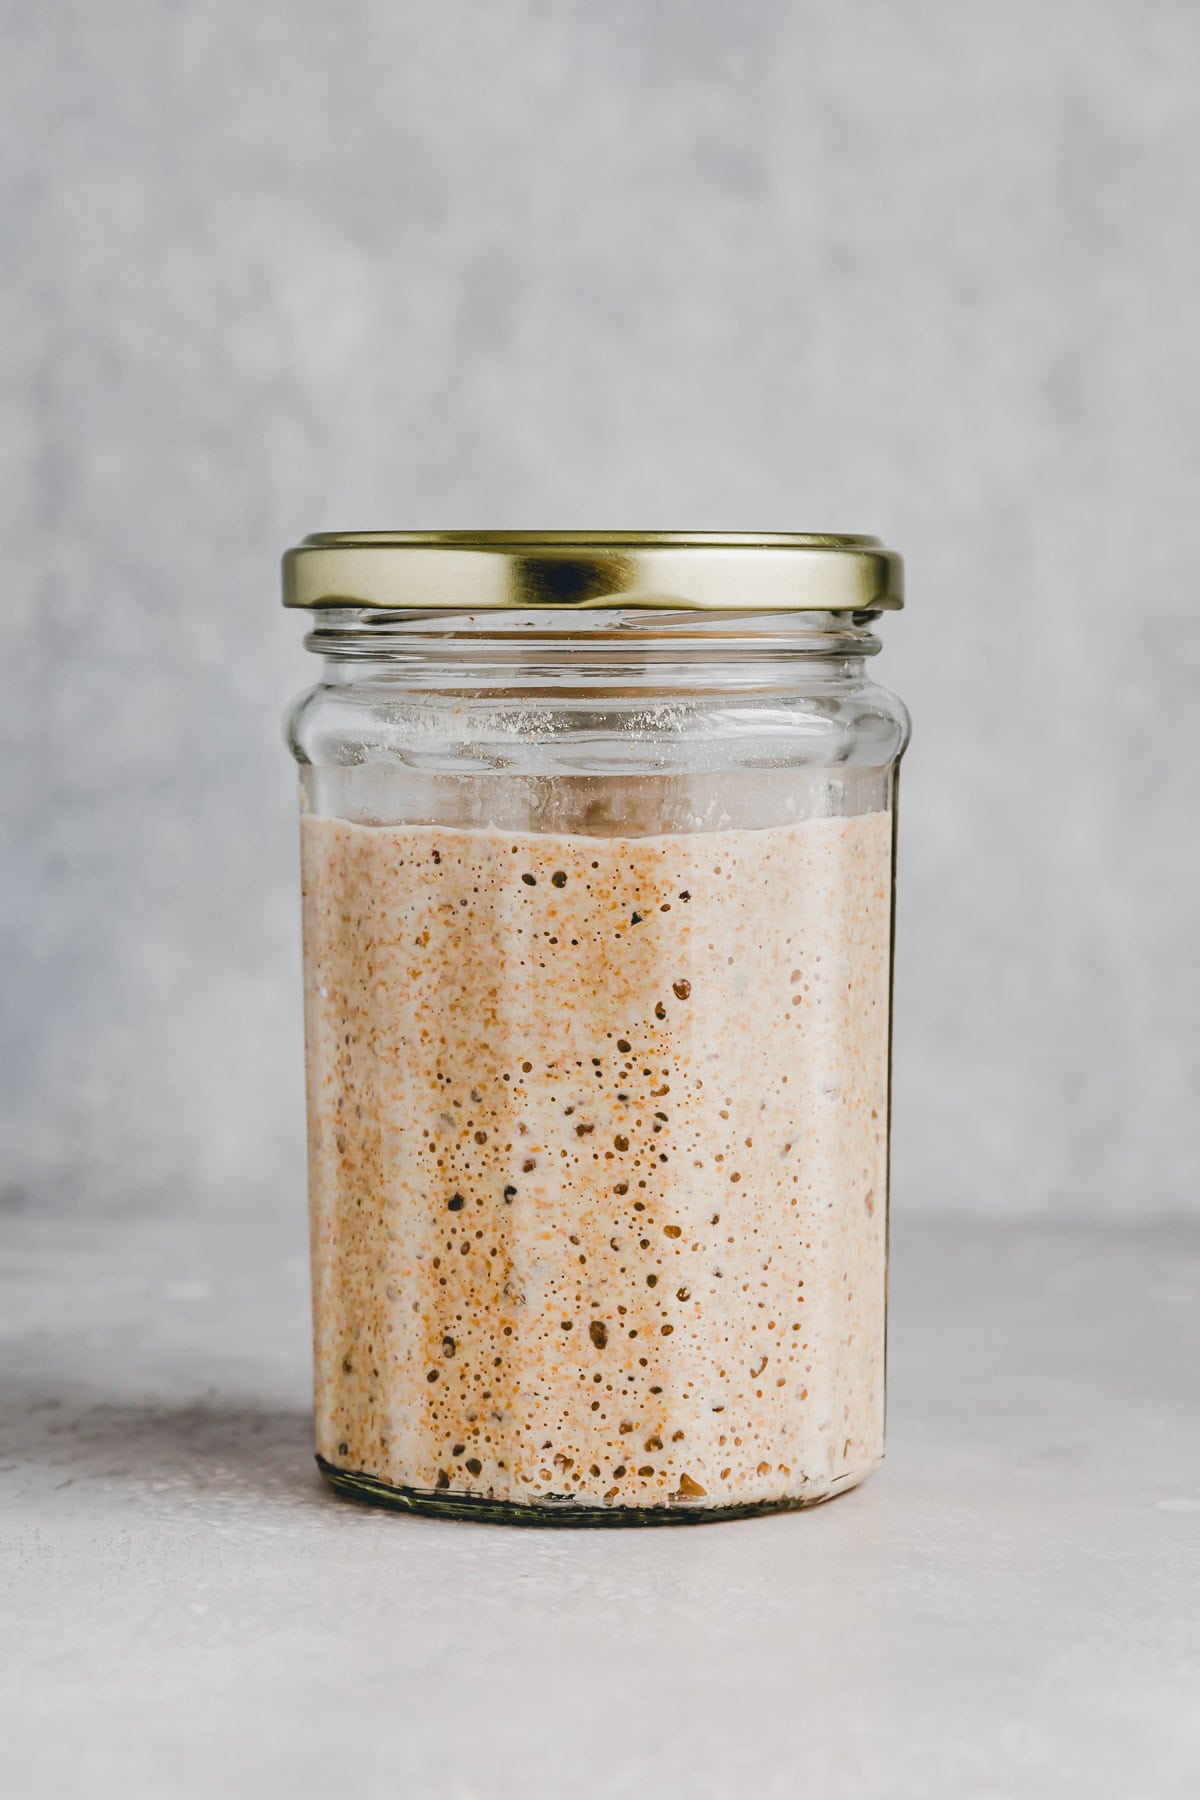
- Sourdough Starter: You'll need 20g of an active starter. → In this blog post, you'll learn how to make your own sourdough starter! In 8 days, you can create your own starter culture at home.
- Bread Flour: It’s important to use bread flour as this has a higher protein percentage than all-purpose flour. Alternatively, you can use Italian Manitoba or Tipo 00 flour. If you only have regular white flour, reduce the water to 310-320ml.
- Whole Wheat Flour: This feeds the sourdough. It's best to use organic.
- Water: Should be lukewarm (about 77-86°F / 25-30°C). It shouldn't be warmer than 104°F / 40°C, or the bacteria in the sourdough will die.
- Salt: Adds flavor to the bread.
Visual Step-by-Step Instructions
This visual step-by-step instruction will help you along the way - definitely recommended if you're a baking beginner!
- SOURDOUGH LEVAIN: Mix 20g of active starter and 100ml lukewarm water in a bowl with a spoon. Stir in 50g white flour and 50g whole wheat flour, cover with a clean kitchen towel, and let rest at room temperature overnight.
- AUTOLYSE: Add 330ml lukewarm water, 450g white flour, and 50g whole wheat flour to the sourdough in the bowl. Mix with a spoon, then cover and let rest at room temperature for 45 minutes.
- KNEADING: Add the salt, and knead, stretch, and fold the dough by hand for 5 minutes.
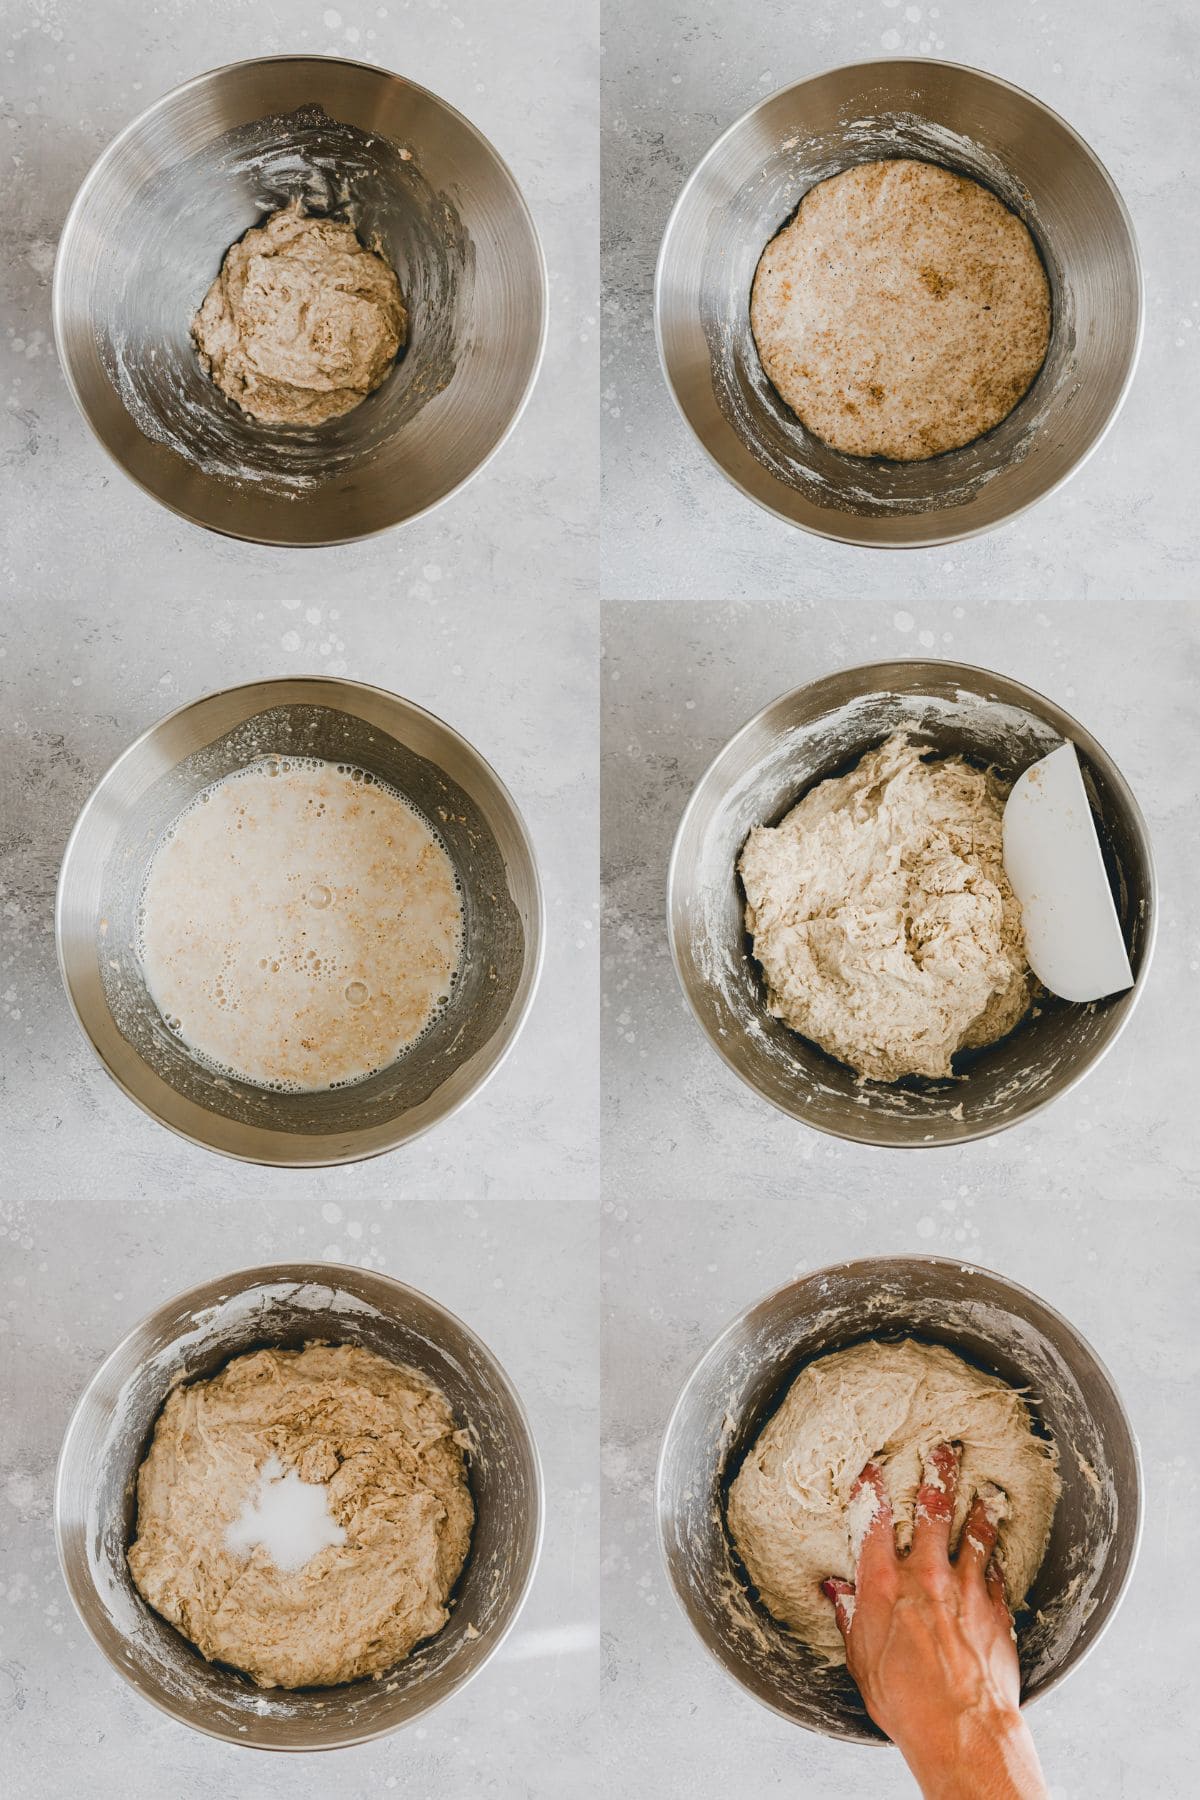
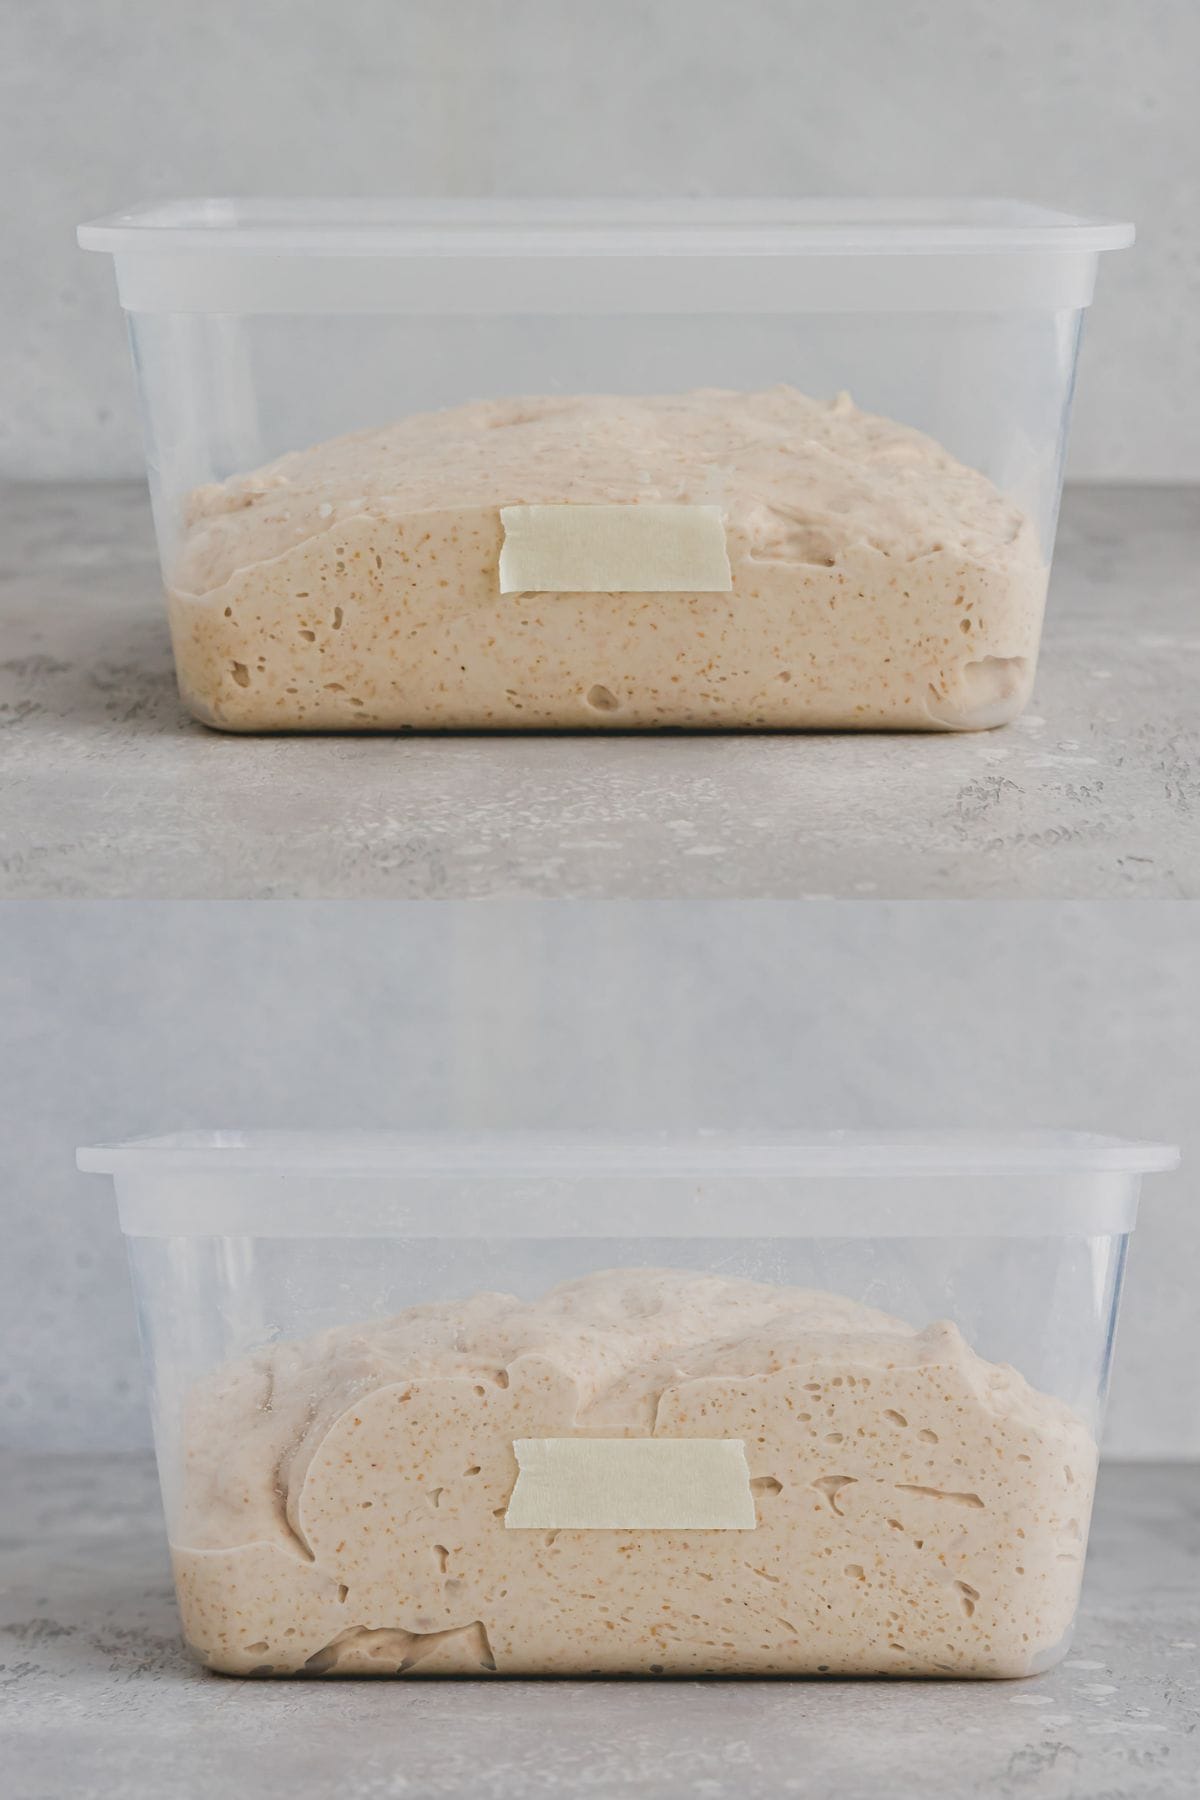
- BULK FERMENTATION: Transfer the dough to a clear container (about 2 liters), and fold the dough every 30 minutes for the next 3 ½ hours. Here's how: with a wet hand, gently pull a part of the dough up and fold it into the center. Repeat this on all four sides (left, right, top, bottom). → During bulk fermentation, a strong dough structure will develop.

- The dough should increase in volume by about 20-30%. You'll notice this best in a clear container (mark the initial dough height with a piece of tape before bulk fermentation). If the dough hasn't gained enough volume yet, you can let it rest at room temperature for another 2-3 hours (without folding). → The timing may vary depending on how active your sourdough starter is and the room temperature.
- SHAPING & RESTING: Place the dough on a lightly floured work surface using a dough scraper. Fold the dough over itself so the floured side is on the outside. Now, using a lightly floured hand and the bench scraper, shape the dough into a round ball to build surface tension. Then let the dough rest for 20-30 minutes on the counter.
- Lightly flour the surface of the dough, then flip it over so the floured side is down. Pull the third of the dough closest to you up and fold it over the middle third. Repeat with the right, left, and top thirds. Finally, pick up the dough and fold it over itself so the smooth side is on top.
- Gently cup your hands around the dough and drag it towards you across the unfloured surface 2-3 times until a smooth, round ball forms.
- PROOFING: Generously dust a 9-inch proofing basket (banneton) with flour (a small sieve works great for this). Place the dough ball smooth side down into the basket. Cover with a clean kitchen towel and let it rest for 3 hours. → If you choose option 2, place the basket in a plastic bag, seal it, and let the bread proof in the fridge for 8-12 hours. Check the blog post for more details.
- SCORING & BAKING: Preheat the oven along with a Dutch oven to 500°F (260°C) for 30 minutes.
- Turn the bread out onto a piece of parchment paper (tip: place the parchment paper on a cutting board and flip it over the proofing basket for an easy transfer). Score the top with a sharp bread lame in a simple square pattern. → For a raised crust like in the pictures, score the bread at a shallow angle.
- Carefully remove the hot Dutch oven from the oven (caution: it's very hot!). Place the bread with the parchment paper inside the Dutch oven, close the lid, and bake at 450°F (230°C) for 20 minutes.
- Remove the lid and bake for another 25 minutes at 450°F (230°C).
- Let the bread cool completely on a wire rack before slicing (2-3 hours). → If you can't wait, you can slice it sooner!

Tip for slicing sourdough bread: Cut the bread in half, place the cut side down, and then slice it. It's much easier than trying to slice the whole loaf at once.
Time Management
I've made a handy table to help you plan your baking schedule. You'll see that the final proof (the last rise before baking) can be either 3 hours at room temperature or 8-12 hours in the fridge, depending on when you start and how it fits into your day.
| Step | Time | Time Option 1 | Time Option 2 |
|---|---|---|---|
| Sourdough | 8-12 hours | The night before | 8:00 am |
| Autolyse | 45 minutes | 8:00 – 8:45 am | 4:00 – 4:45 pm |
| Bulk Fermentation | 3 ½ hours | 8:45 am – 12:15 pm | 4:45 – 8:15 pm |
| Shaping & Bench Rest | 30 minutes | 12:15 – 12:45 pm | 8:15 – 8:45 pm |
| Final Proof | 3 hours at 77°F (25°C) or 8-12 hours at 39°F (4°C) | 12:45 – 3:45 pm | Overnight |
| Baking | 45 minutes | 3:45 – 4:30 pm | Next morning |
Option 1: Start your sourdough the night before, and you'll have fresh bread out of the oven by 4:30 pm.
Option 2: Start your sourdough in the morning, let it proof overnight in the refrigerator, and bake the bread the next morning.
Choose whichever option fits best into your schedule, or feel free to try both. 😉 If the bread proofs overnight in the fridge, the sour flavor will be a bit more intense.
I've practiced a lot until I finally perfected my sourdough bread. If you want to dive deeper into the art of simple sourdough bread, I recommend the book Tartine Bread by Chad Robertson. My recipe is based on the principles I learned from this book, but I've adapted it to work well with lower hydration – suitable for beginners.

Storage & Freezing Instructions
- Store: Wrapped in a kitchen towel, the bread will stay fresh for 2-3 days.
- Freeze: I always freeze half of the bread right after it has completely cooled. I slice it beforehand and pack the single slices in a freezer bag. Thaw single slices directly in the toaster when ready to eat. This way, you'll always have fresh bread at home, and there's hardly any waste.
Did You Make This Recipe?
If you enjoyed this recipe, please consider leaving a ⭐ star rating and let me know how it went in the 📝 comments below.
Follow me on Instagram, Pinterest, or Facebook, and sign up for my free newsletter to stay updated with new recipes. Thank you for your support! ❤️✨
📖 Recipe

Sourdough Bread
email me this recipe 💌
Ingredients
Sourdough
- 20 g sourdough starter
- 100 ml lukewarm water
- 50 g bread flour, or manitoba flour
- 50 g whole wheat flour
Main-Dough
- 330 g lukewarm water
- 450 g bread flour, or manitoba flour
- 50 g whole wheat flour
- 10 g salt
Instructions
SOURDOUGH LEVAIN
- Mix 20g of active starter and 100ml lukewarm water in a bowl with a spoon. Stir in 50g white flour and 50g whole wheat flour, cover with a clean kitchen towel, and let rest at room temperature overnight.
AUTOLYSE
- Add 330ml lukewarm water, 450g white flour, and 50g whole wheat flour to the sourdough in the bowl. Mix with a spoon, then cover and let rest at room temperature for 45 minutes.
KNEADING
- Add the salt, and knead, stretch, and fold the dough by hand for 5 minutes.
BULK FERMENTATION
- Transfer the dough to a clear container (about 2 liters), and fold the dough every 30 minutes for the next 3 ½ hours. Here's how: with a wet hand, gently pull a part of the dough up and fold it into the center. Repeat this on all four sides (left, right, top, bottom). → During bulk fermentation, a strong dough structure will develop.
- The dough should increase in volume by about 20-30%. You'll notice this best in a clear container (mark the initial dough height with a piece of tape before bulk fermentation).If the dough hasn't gained enough volume yet, you can let it rest at room temperature for another 2-3 hours (without folding). → The timing may vary depending on how active your sourdough starter is and the room temperature.
SHAPING
- Place the dough on a lightly floured work surface using a dough scraper. Fold the dough over itself so the floured side is on the outside. Now, using a lightly floured hand and the bench scraper, shape the dough into a round ball and let it rest for 20-30 minutes.
- Lightly flour the surface of the dough, then flip it over so the floured side is down. Pull the third of the dough closest to you up and fold it over the middle third. Repeat with the right, left, and top thirds. Finally, pick up the dough and fold it over itself so the smooth side is on top.
- Gently cup your hands around the dough and drag it towards you across the unfloured surface 2-3 times until a smooth, round ball forms.
PROOFING
- Generously dust a 9-inch proofing basket with flour (a small sieve works great for this). Place the dough ball smooth side down into the basket. Cover with a clean kitchen towel and let it rest for 3 hours. → If you choose option 2, place the basket in a plastic bag, seal it, and let the loaf proof in the fridge for 8-12 hours. Check the blog post for more details.
SCORING & BAKING
- Preheat the oven along with a Dutch oven to 500°F (260°C) for 30 minutes.
- Turn the bread out onto a piece of parchment paper (tip: place the parchment paper on a cutting board and flip it over the proofing basket for an easy transfer). Score the top with a sharp bread lame in a simple square pattern. → For a raised crust like in the pictures, score the bread at a shallow angle.
- Carefully remove the hot Dutch oven from the oven (caution: it's very hot!). Place the bread with the parchment paper inside the Dutch oven, close the lid, and bake at 450°F (230°C) for 20 minutes.
- Remove the lid and bake for another 25 minutes at 450°F (230°C).
- Let the bread cool completely on a wire rack before slicing (2-3 hours). → If you can't wait, you can slice it sooner!
Notes
- Bread Flour: It’s important to use bread flour as this has a higher protein percentage than all-purpose flour. Alternatively, you can use Manitoba Flour (Type 0) or Pizza Flour (Type 00). If you only have regular white flour, reduce the water to 310-320ml.
- Store: Wrapped in a kitchen towel, the bread will stay fresh for 2-3 days.
- Freeze: I always freeze half of the bread right after it has completely cooled. I slice it beforehand and pack the single slices in a freezer bag. Thaw single slices directly in the toaster when ready to eat. This way, you'll always have fresh bread at home, and there's hardly any waste.


Comments
No Comments